If you're looking to supercharge your Microsoft Access application by connecting it to SQL Server, you're in the right place. This approach brings the best of both worlds: the power and reliability of SQL Server to safely store your data, plus the easy-to-build interface and forms of Access. Let's walk through the process step by step, and cover some important gotchas, so you can link your SQL Server tables directly into Access and work with live server data - just like you're used to with a split Access database.
You might have spent a lot of time inside SQL Server Management Studio so far, doing all your table-building and setup. That's great, but as an Access developer, you live and breathe Access. So now comes the fun part - actually connecting these two tools so Access becomes a live front end and SQL Server does the heavy lifting on the back end.
The key thing to remember is this: SQL Server stays the system of record. That's where your actual data is safely stored. Access simply provides a way to view and edit that data. We're not importing our tables into Access - instead, we're linking to them, so every change is live, and you see real-time results. If you've split an Access database before, this works the same way, only now the back end is SQL Server rather than another Access file.
When you link tables in Access, you're just creating pointers that reference your SQL Server tables. It's like giving Access a map to where the data lives. Opening up a linked table in Access means you're looking directly at the data inside SQL Server. Be careful not to confuse linking with importing: importing brings over a static snapshot and doesn't stay synchronized, whereas linked tables always point to the live data.
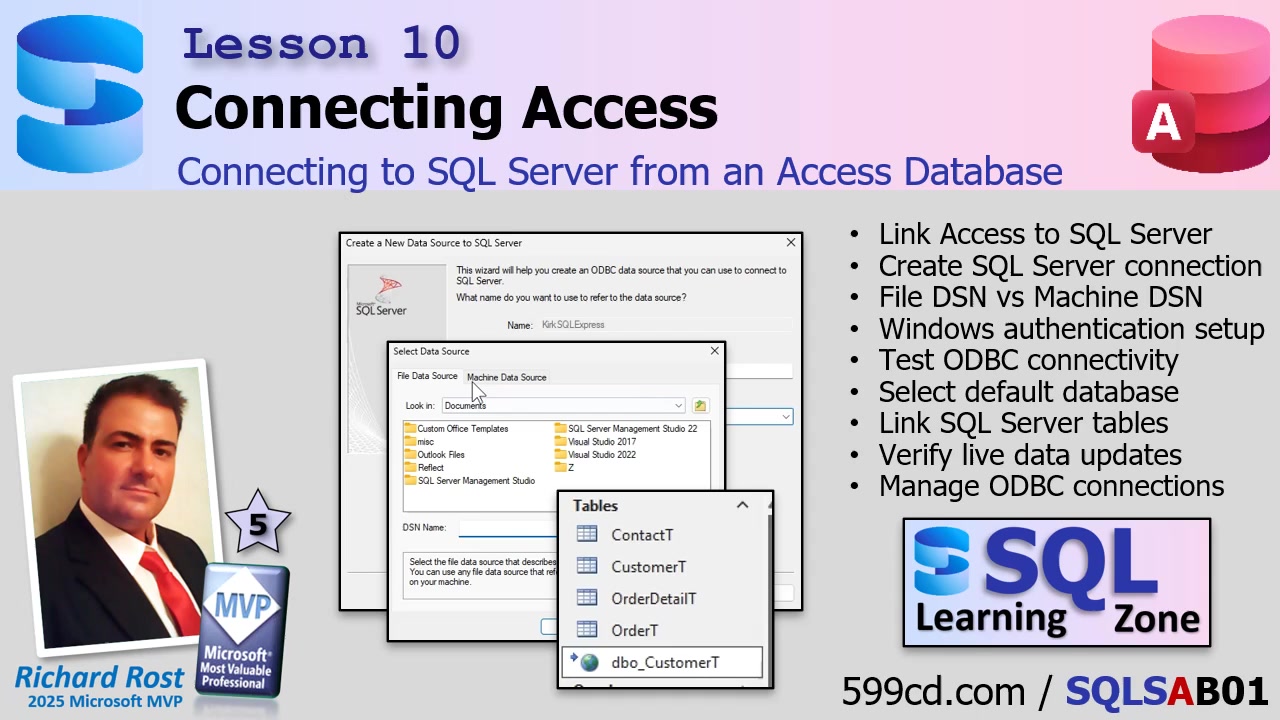
To get started, open up your Access database (I'm using my trusty free TechHelp template for this). Head to the External Data tab, and choose New Data Source > From Database > From SQL Server. You'll want to select "Link to the data source by creating a linked table." This will launch a wizard to help you establish your connection.
Here comes a crucial piece: Access and SQL Server talk through something called ODBC (Open Database Connectivity). You need to pick or create a Data Source Name (DSN), which is essentially a little file that stores all your connection settings. There are two main flavors: file DSNs (little .dsn files you can copy/share easily) and machine DSNs (saved in the Windows config of a particular computer). For most small offices or personal setups, file DSNs are usually the easiest to wrangle, because you can move them between computers.
If you don't see your DSN listed, just hit New to create one. Now, the key step here is picking the right driver so Access and SQL Server speak the same language. You'll likely see multiple options - "SQL Server," "ODBC Driver 17 for SQL Server," and "ODBC Driver 18 for SQL Server." Here's your pro tip: use Driver 17 if you want the smoothest experience! The plain "SQL Server" entry is older and not recommended for modern setups, and Driver 18, while tempting (it's newer), tends to enforce strict security and may bring up annoying security prompts if you're just testing things out. Driver 17 gives you all the compatibility you need, without the headaches.
After choosing your driver, you'll be prompted to name your DSN file. Use any name that makes sense to you. I usually pick something that tells me which server I'm pointing to - like "Kirk SQL Express." Next, you'll set up which server to connect to. Don't count on the Browse button to work reliably; it usually doesn't. Type in either the server's name or its IP address - whatever you've used before in SQL Server Management Studio.
For authentication, choose Windows authentication unless you know you're set up for SQL Server authentication. Now comes a common pitfall: before you finish, make sure to set the "default database" to the one actually holding your tables. If you skip this, you'll connect to the system master database and just get a sea of "sys" system objects instead of your real tables! Use the dropdown on the connection wizard to select your actual database.
If you do miss this step, don't sweat it - just run through the wizard again and make a new DSN. It doesn't hurt to practice, and you can always clean up DSNs later.
Once you've created the DSN with all the right info, select it in Access and hit OK. The Link Tables dialog pops up, showing you all available tables in your database (ignore anything starting with "sys" - those are system tables). Find your actual user table, something like DBO.CustomerT, and select it.
If your table uses modern SQL Server data types, you'll probably get a warning about the DateTime2 data type. SQL Server's DateTime2 supports fractional seconds, and Access now offers a "DateTime Extended" type to handle this. If you're using Access 2016 or newer, it's fine to enable this support by clicking Yes. Just be aware: if anyone's using Access 2013 or older, say No to ensure backward compatibility, but you'll lose out on those fractional seconds. In modern environments - definitely say Yes!
The connection will finish, and you'll now see your live SQL Server table as a linked table in Access, complete with the "DBO_" prefix. You might want to rename linked tables to something simpler, but personally, I find the DBO prefix reminds me these are SQL Server objects, which is handy when you're writing queries or code. It also signals to you (and your future self) when you need to handle things like connection string quirks or special syntax in your VBA or queries.
Let's test our handiwork. Open your linked table in Access, make a change to some data, and close it. Then check that change inside SQL Server Management Studio. If you see the change reflected there instantly, congratulations - you're working live over the connection! This is exactly what linking tables is all about.
On the topic of DSNs: once your tables are linked, Access actually stores all the connection info internally. You don't need to keep the DSN file around unless you want to link more tables later. You can use Windows' built-in ODBC Data Source Administrator (search "ODBC" in the Start menu) to view, edit, or remove DSNs. If you want, you can rename or tidy up your DSN files in your Documents folder - or even distribute copies to other users if you're setting up more workstations.
Before wrapping up, let's clarify some sticky points so you don't trip over common beginner mistakes:
First, SQL Server's DateTime2 corresponds to Access's DateTime Extended data type. They work together, but they're not technically identical. DateTime2 lets you store higher-precision dates on the server. DateTime Extended enables Access to round-trip that high-precision data, so you won't get data loss or weird rounding errors.
Second, when picking ODBC drivers, use Driver 17 or 18 for modern setups; avoid the legacy "SQL Server" driver. And if your SQL Server is running on a named instance, remember to specify it, like "Kirk\SQLExpress" - sometimes just the server name is enough, but sometimes you need the whole thing depending on your network setup.
Today you learned how to bridge your Access front end with SQL Server, bringing in live, linked tables that deliver all the robustness of SQL Server with the user-friendly experience of Access. Play around with it, try making some forms or queries - as far as Access is concerned, a linked SQL Server table works almost just like a local one. And if you get stuck, re-check those DSN or driver choices.
For the complete, step-by-step demonstration, be sure to watch the video embedded above. Got questions? Drop a comment - I love hearing what you want to learn in future lessons.
Live long and prosper,
RR
No comments:
Post a Comment